Sports

https://www.espncricinfo.com/ci/engine/match/scores/desktop.html
Wednesday, October 12, 2022

 PostgreSQL 13 pg_stat_statements


Overview

Today, we will discuss, how to configure pg_stat_statements in PostgreSQL 13 for Performance improvement strategies

The pg_stat_statements module provides a means for tracking the planning and execution statistics of all SQL statements executed by a server. The module must be loaded by adding pg_stat_statements to shared_preload_libraries in PostgreSQL. conf, because it requires additional shared memory.

Let's start

We will run below SQL Query for pg_stat_statements findings.

SQL Query (Make sure that you have opened and connected with your database using PgAdmin 4 Tool)

SQL

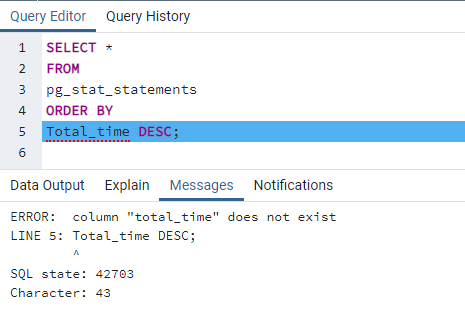
SELECT * FROM pg_stat_statements ORDER BY Total_time DESC;


Error Message

As we can see, it's generating an Error message with the description "ERROR: relation "pg_stat_statements" does not exist at character 17

How to resolve this Error

First of all, we have to install an Extension for pg_stat_statements for further work, so we will type the below SQL command in PgAdmin 4 Query Editor

CREATE Extension pg_stat_statements;


Now, as we can see the problem is not resolved yet, so after digging out for finding the root cause

Following PostgreSQL.conf entries are required to be added for proper functionality

Open PostgreSQL.conf and add these lines

# Configuration for pg_stat_statements

shared_preload_libraries = 'pg_stat_statements'

#compute_query_id = on

pg_stat_statements.max = 10000

pg_stat_statements.track = all

Restart PostgreSQL services from Services.msc


Now the problem is still there, what is exactly happening with this Error message.

Looking into Log File

After reading PostgreSQL documentation, i found these lines which are explaining clearly about this error message

pg_stat_statements for Postgres 13 does not contain: total_time, min_time, max_time, mean_time, stddev_time columns

Modify the above Query/SQL statement

SQL Query

SELECT t2.rolname, t3.datname, queryid, calls
, ( total_plan_time + total_exec_time ) / 1000 as total_time_seconds
, ( min_plan_time + min_exec_time ) / 1000 as min_time_seconds, ( max_plan_time + max_exec_time ) / 1000 as max_time_seconds
,( mean_plan_time + mean_exec_time ) / 1000 as mean_time_seconds
,( stddev_plan_time + stddev_exec_time ) / 1000 as stddev_time_seconds
, rows, shared_blks_hit, shared_blks_read, shared_blks_dirtied, shared_blks_written
, local_blks_hit, local_blks_read, local_blks_dirtied, local_blks_written, temp_blks_read
, temp_blks_written, blk_read_time / 1000 as blk_read_time_seconds, blk_write_time / 1000 as blk_write_time_seconds
FROM pg_stat_statements t1 JOIN pg_roles t2 ON (t1.userid=t2.oid)
JOIN pg_database t3 ON (t1.dbid=t3.oid) WHERE t2.rolname != 'rdsadmin'
AND queryid IS NOT NULL;


Conclusion

So in this article, we have learned how to configure pg_stat_statements in PostgreSQL 13.

Useful Links

https://github.com/prometheus-community/postgres_exporter/issues/541

https://stackoverflow.com/questions/31021174/pg-stat-statements-enabled-but-the-table-does-not-exist

https://www.postgresql.org/docs/current/pgstatstatements.html


Tuesday, September 20, 2022

MySQL tables with row count


MySQL table row count information_schema

Overview


We can use Workbench or SQLYog or Putty prompt for connecting with our MySQL database.
My test database name is 'ABC' and I will connect through this with this below command.

 /opt/lampp/bin/mysql -uroot -p abc 
Note: We can skip the database name and connect to the database

(see diagram 1.1)
I am using Putty to connect to the MySQL database as below:-

Diagram 1.1


Finding Row count with Database Tables

Here is the SQL Query for finding MySQL database Schema with their Table Names and Row Count.

mysql> SELECT TABLE_SCHEMA,TABLE_NAME,SUM(TABLE_ROWS) FROM
            INFORMATION_SCHEMA.TABLES
            WHERE TABLE_SCHEMA='abc'
            GROUP BY TABLE_NAME,TABLE_SCHEMA ORDER BY 1;


Second Part of the attached image


Conclusion


The above SQL Query has returned 82 Tables with their Schema name and Row Count.
We can use this query after Data Migration especially from on-prem to AWS Cloud environment using Workbench.
Monday, September 19, 2022

How to Install HRMS Legislative Data

How to apply Oracle Hrglobal Legislative Patch

oracle hrms login
  

HRMS Global Steps

  •   Stop Apps Services  

  • Set Apps environment and enable Maintenance Mode.

                . ./apps/apps_st/appl/TEST_paytest.en

  • Enable Maintenance Mode using adadmin command

              Choose 5 and 1 Options Enable Maintenance Mode and finally press Enter Key twice       


  • Download Unzip and Apply Patch p11072961_R12.FND.B_R12_LINUX.zip
  • Download Unzip and Apply Patch p16000686_R12.HR_PF.B_R12_LINUX.zip 
  • Run Data Install

        “java oracle.apps.per.DataInstall apps apps thin hrtest.mydomain.com:1521:TEST

  • Select Options 1I (I stands for Install)

        Select 1st Option for Global HRMS and Type 1I 
          Press 4 Exit with Y option which saves your settings

  • Now Apply "hrglobal.drv" Patch
        $PER_TOP/12.0.0/patch/115/driver/hrglobal.drv 

  • Disable Maintenance mode

  • Start Apps Services

  •     Conclusion
            I hope that in this way, we can apply hrglobal.drv with this article.


Thursday, September 15, 2022

Scheduling Oracle Enterprise 13c OMS backup

13c OMS Schedule Backup

Overview

Let's configure Oracle 13c OMS that is running with the following details:-

Operating System        Oracle Linux 6.10 (el6uek.x86_64)

Database SID               testdb

Database Version         Oracle Database 12c Enterprise Edition Release 12.2.0.1.0 - 64bit Production

Oracle 13c OMS Ver   Oracle Enterprise Manager Cloud Control 13c Release 3

Following is the script for taking weekly cold backup for 13c OMS Server in a Linux environment

Step 1

Create a script with cold.sh as per my sample script

Script

echo

echo

date

echo

echo "Shutting Down OMS Services of 13c Monitoring Cloud Control for Cold Backup ......."

echo

echo

echo

export ORACLE_HOME=/u01/db/dbhome_1

export ORACLE_SID=testdb

export OMS_HOME=/u01/cloud/middleware

export AGENT_HOME=/u01/cloud/agent/agent_13.3.0.0.0

$OMS_HOME/bin/emctl stop oms -all

/u01/cloud/agent/agent_13.3.0.0.0/bin/emctl stop agent

echo "Shutting Down Database and Listener Services of 13c Monitoring Cloud Control for Cold Backup ......."

echo

echo

echo

#$ORACLE_HOME/bin/sqlplus "/ as sysdba" <<EOF1

#shutdown immediate;

#EOF1

#sqlplus "/ as sysdba" <<EOF1

#shutdown immediate;

#EOF1

#$ORACLE_HOME/bin/lsnrctl stop

date

echo

sleep 10;

date

echo "All Services are down for 13c Monitoring Cloud Control Cold Backup ......."

echo

echo

echo

date

echo "Starting Tar Backup for 13c Monitoring Cloud Control with Database"

echo

echo

echo

AS1=Oracle13c-OMS-TAR_$(date +%d-%m-%Y).tgz

#AS2=Oracle13c-DB-TAR_$(date +%d-%m-%Y).tgz

#AS3=Oracle13c-DBInventory-TAR_$(date +%d-%m-%Y).tgz

echo

/bin/tar -cvzf /u01/backup/cold/$AS1 /u01/cloud

#/bin/tar -cvzf /u01/backup/cold/$AS2 /u01/db

#/bin/tar -cvzf /u01/backup/cold/$AS3 /u01/oraInventory

echo

echo

date

echo

echo "Backup Successfully Completed for 13c Monitoring Cloud Control"

echo "Starting 13c Monitoring Cloud Control Services ......."

$ORACLE_HOME/bin/lsnrctl start

$ORACLE_HOME/bin/sqlplus "/ as sysdba" <<EOF1

startup;

EOF1

$OMS_HOME/bin/emctl start oms

/u01/cloud/agent/agent_13.3.0.0.0/bin/emctl start agent

date

echo "All Services are Up after 13c Monitoring Cloud Control Cold Backup Completion ......."

echo

echo


Step2

Create a crontab schedule job for running the above script on a weekly basis

01 00 * * 6 /home/oracle/backup/scripts/cold.sh > /home/oracle/backup/logs/cold.log

Conclusion

This script will run at 00:01 on Saturday Night, you may change it accordingly as per your desired time.


Thursday, September 15, 2022

Migrate Weblogic Domain to another Server

Migrate WebLogic 12c steps in Linux

Overview

Here I am going to share with you how we can rename WebLogic 11g Instance for cloning purposes or as per any other requirement.

Example

We have 2 x Linux Servers

Server 1 = prodserver.domain.com

Server 2 = testserver.domain.com

Step 1

Edit file vi /oracle/domains/FRDomain/config/fmwconfig/servers/AdminServer/applications/em/META-INF/emoms.properties

And change

1.       oracle.sysman.emSDK.svlt.ConsoleServerHost=testserver.domain.com

2.       oracle.sysman.emSDK.svlt.ConsoleServerName=testserver.domain.com:7001_Management_Service

Step 2

Open file /oracle/domains/FRDomain/servers/WLS_REPORTS/tmp/_WL_user/reports_11.1.2/uxabaw/configuration/rwservlet.properties and change host name entry.

Step 3

Edit Start and Stop Web logic scripts

Open file /oracle/domains/FRDomain/bin/startWebLogic.sh and edit host name entry.

Open file /oracle/domains/FRDomain/bin/stopWebLogic.sh and edit host name entry.

Open file /oracle/domains/FRDomain/bin/startManagedWebLogic.sh and edit host name entry.

Open file /oracle/domains/FRDomain/bin/stopManagedWebLogic.sh and change host name entry.

Step 4

Verify both scripts

1)      Start Weblogic using script and Form and Report Services.

2)      Stop Weblogic using script and Form and Report Services.

Conclusion

In this way, we can make a Test Server for Weblogic Forms and Reports environment.

Thursday, September 15, 2022

SQL server to PostgreSQL data types mapping

postgresql vs sql server syntax differences


Data Types Mapping for Migrating 

 Microsoft SQL Server to PostgreSQL or vice versa

Microsoft SQL Server and PostgreSQL have some similar data types while others are not. Before migration, it is important to keep in mind the right types representing:

SQL Server Data Types

PostgreSQL Data Types

BIGINT

BIGINT

BINARY(n)

BYTEA

BIT

BOOLEAN

CHAR(n), CHARACTER(n)

CHAR(n), CHARACTER(n)

DATE

DATE

DATETIME

TIMESTAMP(3)

DATETIME2(p)

TIMESTAMP(p)

DATETIMEOFFSET(p)

TIMESTAMP(p) WITH TIME ZONE

DECIMAL(p,s), DEC(p,s)

DECIMAL(p,s), DEC(p,s)

DOUBLE PRECISION

DOUBLE PRECISION

FLOAT(p)

FLOAT(p)

IMAGE

BYTEA

INT, INTEGER

INT, INTEGER

MONEY

MONEY

NCHAR(n)

CHAR(n)

NTEXT

TEXT

NUMERIC(p,s)

NUMERIC(p,s)

NVARCHAR(n)

VARCHAR(n)

NVARCHAR(max)

TEXT

REAL

REAL

ROWVERSION

BYTEA

SMALLDATETIME

TIMESTAMP(0)

SMALLINT

SMALLINT

SMALLMONEY

MONEY

TEXT

TEXT

TIME(p)

TIME(p)

TIMESTAMP

BYTEA

TINYINT

SMALLINT

UNIQUEIDENTIFIER

UUID or CHAR(16)

VARBINARY(n), VARBINARY(max)

BYTEA

VARCHAR(n)

VARCHAR(n)

VARCHAR(max)

TEXT

XML

XML


Thursday, September 15, 2022

SQL Query to get Row Count For all Tables in SQL Server


 SQL Query to get Row Count For all Tables in SQL Server


Overview

I am using the AdventureWorks as default database and will open Query Analyzer after selecting this database
Here is the download link for AdventureWorks for almost all available MS SQL Server versions

https://docs.microsoft.com/en-us/sql/samples/adventureworks-install-configure?view=sql-server-ver16&tabs=ssms


Open Query Analyzer


Write / Copy the following Query as below

SELECT
      QUOTENAME(SCHEMA_NAME(sOBJ.schema_id)) + '.' + QUOTENAME(sOBJ.name) AS [TableName]
      , SUM(sPTN.Rows) AS [RowCount]
FROM 
      sys.objects AS sOBJ
      INNER JOIN sys.partitions AS sPTN
            ON sOBJ.object_id = sPTN.object_id
WHERE
      sOBJ.type = 'U'
      AND sOBJ.is_ms_shipped = 0x0
      AND index_id < 2 -- 0:Heap, 1:Clustered
GROUP BY 
      sOBJ.schema_id
      , sOBJ.name
ORDER BY [TableName]
GO


Conclusion

The above SQL Query has returned 71 Tables with their Schema name and Row Count.

Thursday, September 15, 2022

PostgreSQL Count Rows in all Tables


Postgresql Count Rows in All Tables


Overview

Open Pgadmin 


Now it will look like the below window


Type this below Query or Just Copy From Here.

WITH TBL AS
(SELECT TABLE_SCHEMA,
TABLE_NAME
FROM INFORMATION_SCHEMA.TABLES
WHERE TABLE_NAME not like 'pg_%' )
SELECT TABLE_SCHEMA,
TABLE_NAME,
(XPATH('/row/c/text()',
QUERY_TO_XML(FORMAT('select count(*) as c from %I.%I',

TABLE_SCHEMA,
TABLE_NAME),
FALSE,
TRUE,
'')))[1]::text::int AS TOTAL_ROWS
FROM TBL
ORDER BY 1 DESC,
3 DESC;

Results 


Conclusion

This is better to use this query when you are planning either to migrate your database or you have recovered your database from any backups and verify PostgreSQL records.

Wednesday, April 26, 2017

How to Apply Opatch in Oracle Apps R12

How to apply Opatch in Oracle Home in ERP R12


OPATCH CONFIGURATION ISSUES
A.      ERROR: OPatch failed because of an Inventory problem.
B.      ERROR: OPatch failed because of problems in the patch area.
C.      The patch directory area must be a number.

SOLUTION
1.       First of Check and locate /etc/oraInst.loc, File, and see Inventory path. It must be According to Current Environment SID.
2.       For applying OPatch in EBS, one should remember to copy New Patch in /d01/oracle/PROD/apps/tech_st/10.1.2/.patch_storage Directory.

HOW TO APPLY PATCH
·         Set Apps Node environment variable.
·         Copy Zip file to /d01/oracle/PROD/apps/tech_st/10.1.2/.patch_storage location.
·         Unzip File and go to the newly created Patch directory.
·         run command "opatch apply" and wait for the completion process


Enjoy Opatch patching ..............................

Popular