Sports

https://www.espncricinfo.com/ci/engine/match/scores/desktop.html
Showing posts sorted by relevance for query Server. Sort by date Show all posts
Tuesday, August 12, 2014

How to Check Application Version in Oracle Apps R12

sql query to find file version in oracle apps

how to check database version in oracle

Join the newsletter

Subscribe to get our latest content by email.
You can use adident after setting APPS<SID>.env variable in ERP R12 or 11i

adident Header <file name>

Example :

You can give the whole directory path and run this as
[oracle@test server]$ adident Header $JAVA_TOP/oracle/apps/pos/supplier/webui/ByrMngSitesCO.class

$Header ByrMngSitesCO.java 120.22.12010000.8 2009/11/20 19:13:22 atjen ship $

or goto $JAVA_TOP/oracle/apps/pos/supplier/webui directory and type

[oracle@test server]$ cd $JAVA_TOP/oracle/apps/pos/supplier/webui
[oracle@test webui]$ adident Header ByrMngSitesCO.class
ByrMngSitesCO.class:
$Header ByrMngSitesCO.java 120.22.12010000.8 2009/11/20 19:13:22 atjen ship $

The alternate Linux command strings -a and it will return the same result for you

strings -a ByrMngSitesCO.class | grep '$Header'
N$Header: ByrMngSitesCO.java 120.22.12010000.8 2009/11/20 19:13:22 atjen ship $

I hope this helps you understand these two important commands

Thanks in advance,

Muhammad Kamran Saeed

Wednesday, October 12, 2022

 PostgreSQL 13 pg_stat_statements


Overview

Today, we will discuss, how to configure pg_stat_statements in PostgreSQL 13 for Performance improvement strategies

The pg_stat_statements module provides a means for tracking the planning and execution statistics of all SQL statements executed by a server. The module must be loaded by adding pg_stat_statements to shared_preload_libraries in PostgreSQL. conf, because it requires additional shared memory.

Let's start

We will run below SQL Query for pg_stat_statements findings.

SQL Query (Make sure that you have opened and connected with your database using PgAdmin 4 Tool)

SQL

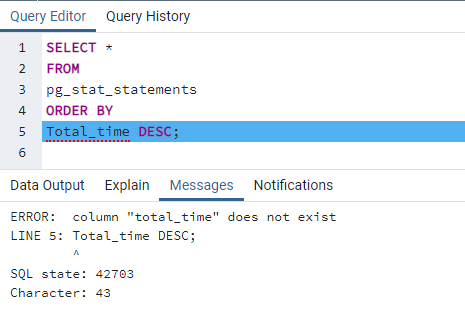
SELECT * FROM pg_stat_statements ORDER BY Total_time DESC;


Error Message

As we can see, it's generating an Error message with the description "ERROR: relation "pg_stat_statements" does not exist at character 17

How to resolve this Error

First of all, we have to install an Extension for pg_stat_statements for further work, so we will type the below SQL command in PgAdmin 4 Query Editor

CREATE Extension pg_stat_statements;


Now, as we can see the problem is not resolved yet, so after digging out for finding the root cause

Following PostgreSQL.conf entries are required to be added for proper functionality

Open PostgreSQL.conf and add these lines

# Configuration for pg_stat_statements

shared_preload_libraries = 'pg_stat_statements'

#compute_query_id = on

pg_stat_statements.max = 10000

pg_stat_statements.track = all

Restart PostgreSQL services from Services.msc


Now the problem is still there, what is exactly happening with this Error message.

Looking into Log File

After reading PostgreSQL documentation, i found these lines which are explaining clearly about this error message

pg_stat_statements for Postgres 13 does not contain: total_time, min_time, max_time, mean_time, stddev_time columns

Modify the above Query/SQL statement

SQL Query

SELECT t2.rolname, t3.datname, queryid, calls
, ( total_plan_time + total_exec_time ) / 1000 as total_time_seconds
, ( min_plan_time + min_exec_time ) / 1000 as min_time_seconds, ( max_plan_time + max_exec_time ) / 1000 as max_time_seconds
,( mean_plan_time + mean_exec_time ) / 1000 as mean_time_seconds
,( stddev_plan_time + stddev_exec_time ) / 1000 as stddev_time_seconds
, rows, shared_blks_hit, shared_blks_read, shared_blks_dirtied, shared_blks_written
, local_blks_hit, local_blks_read, local_blks_dirtied, local_blks_written, temp_blks_read
, temp_blks_written, blk_read_time / 1000 as blk_read_time_seconds, blk_write_time / 1000 as blk_write_time_seconds
FROM pg_stat_statements t1 JOIN pg_roles t2 ON (t1.userid=t2.oid)
JOIN pg_database t3 ON (t1.dbid=t3.oid) WHERE t2.rolname != 'rdsadmin'
AND queryid IS NOT NULL;


Conclusion

So in this article, we have learned how to configure pg_stat_statements in PostgreSQL 13.

Useful Links

https://github.com/prometheus-community/postgres_exporter/issues/541

https://stackoverflow.com/questions/31021174/pg-stat-statements-enabled-but-the-table-does-not-exist

https://www.postgresql.org/docs/current/pgstatstatements.html


Tuesday, August 12, 2014

How to Apply a Patch in Oracle Apps R12


How to apply apps patch using adpatch R12

How to apply apps patch using adpatch R12


STEP 1 : Download the patch. From your  pc and transfer it to Linux server
*login to oracle metalink.(
www.metalink.oracle.com)
*Select the patches option then select the search type.
*Query for patch by writing the patch no. & platform on which you want to download the patch.
*Click download

If you have downloaded the patch at desktop then move it to directory where you want it to unzip. With winscp or whatever software
Winscp download link  
http://winscp.net/eng/download.php#download

STEP 2 :Unzip the patch. And set the permission 
su root
cd /u01/patch
unzip p16213642_R12.AP.B_R12_LINUX.zip
chown oracle:dba 16213642

STEP 3: Before applying a patch you must check whether the patch is already there or not. For this we query the database:
su oracle
cd /d01/oracle/PROD/db/tech_st/11.1.0/
. ./Test_test.env
sqlplus apps/<apps password

SELECT * FROM AD_APPLIED_PATCHES WHERE PATCH_NAME='16000686';

or

SELECT * FROM AD_BUGS WHERE BUG_NUMBER=16000686


STEP 4: Enable the Maintenance Mode.For This:
#su oracle
# . ./ APPSTEST_test.env
#adadmin
Here you will need system and apps password in order to enter the ad administration utility

Output
 AD Administration Main Menu
   --------------------------------------------------
  1.    Generate Applications Files menu
  2.    Maintain Applications Files menu
  3.    Compile/Reload Applications Database Entities menu
  4.    Maintain Applications Database Entities menu
  5.    Change Maintenance Mode
  6.    Exit AD Administration

Select option 5. The status of maintenance mode is displayed at the top of change maintenance mode menu.Again it will show following options & ask for choice:
1.Enable Maintenance mode.
2.Disable Maintenance mode.
3.Return to Main Menu.
Select option 1. Then return to console.

Stop The application Tier 


STEP 5: Run autopatch from the patch directory by entering the following command:
su oracle
[oracle@test]$cd /u01/patch/16213642/
[oracle@test appl]$adpatch
Note: - below red color will highlighted lines you will have to fill  
Out put
 Copyright (c) 2002 Oracle Corporation
                        Redwood Shores, California, USA

                         Oracle Applications AutoPatch

                                 Version 12.0.0

NOTE: You may not use this utility for custom development
      unless you have written permission from Oracle Corporation.


Attention: AutoPatch no longer checks for unapplied pre-requisite patches.
You must use OAM Patch Wizard for this feature. Alternatively, you can
review the README for pre-requisite information.


Your default directory is '/u01/finsys/apps/apps_st/appl'.
Is this the correct APPL_TOP [Yes] ?

AutoPatch records your AutoPatch session in a text file
you specify.  Enter your AutoPatch log file name or press [Return]
to accept the default file name shown in brackets.

Filename [adpatch.log] : 16213642.log

You can be notified by email if a failure occurs.
Do you wish to activate this feature [No] ?

Please enter the batchsize [1000] :


Please enter the name of the Oracle Applications System that this
APPL_TOP belongs to.

The Applications System name must be unique across all Oracle
Applications Systems at your site, must be from 1 to 30 characters
long, may only contain alphanumeric and underscore characters,
and must start with a letter.

Sample Applications System names are: "prod", "test", "demo" and
"Development_2".

Applications System Name [TEST] : TEST *


NOTE: If you do not currently have certain types of files installed
in this APPL_TOP, you may not be able to perform certain tasks.

Example 1: If you don't have files used for installing or upgrading
the database installed in this area, you cannot install or upgrade
the database from this APPL_TOP.

Example 2: If you don't have forms files installed in this area, you cannot
generate them or run them from this APPL_TOP.

Example 3: If you don't have concurrent program files installed in this area,
you cannot relink concurrent programs or generate reports from this APPL_TOP.


Do you currently have files used for installing or upgrading the database
installed in this APPL_TOP [YES] ? YES *


Do you currently have Java and HTML files for HTML-based functionality
installed in this APPL_TOP [YES] ? YES *


Do you currently have Oracle Applications forms files installed
in this APPL_TOP [YES] ? YES *


Do you currently have concurrent program files installed
in this APPL_TOP [YES] ? YES *


Please enter the name Oracle Applications will use to identify this APPL_TOP.

The APPL_TOP name you select must be unique within an Oracle Applications
System, must be from 1 to 30 characters long, may only contain
alphanumeric and underscore characters, and must start with a letter.

Sample APPL_TOP Names are: "prod_all", "demo3_forms2", and "forms1".

APPL_TOP Name [oftest] : oftest *


You are about to apply a patch to the installation of Oracle Applications
in your ORACLE database 'TEST'
using ORACLE executables in '/u01/finsys/apps/tech_st/10.1.2'.

Is this the correct database [Yes] ?

AutoPatch needs the password for your 'SYSTEM' ORACLE schema
in order to determine your installation configuration.

Enter the password for your 'SYSTEM' ORACLE schema:*******


The ORACLE username specified below for Application Object Library
uniquely identifies your existing product group: APPLSYS

Enter the ORACLE password of Application Object Library [APPS] :*****

Enter the directory where your Oracle Applications patch has been unloaded
The default directory is [/u01/patch/16213642] :
Please enter the name of your AutoPatch driver file : u16213642.drv

If you don’t see the “autopatch is complete” message at the end of the Autopatch log file, Autopatch did not complete successfully.

STEP 6: Finally exit from maintain mode as above  STEP 4
STEP 7: confirm the patch installation status For this we query the database:
su oracle
Run the environment variable db tire
sqlplus apps/<apps password
SQL>select * from AD_BUGS where bug_number=’<patch number>’
Ex:-  SQL>select * from AD_BUGS where bug_number=’16213642’


Thursday, September 15, 2022

Scheduling Oracle Enterprise 13c OMS backup

13c OMS Schedule Backup

Overview

Let's configure Oracle 13c OMS that is running with the following details:-

Operating System        Oracle Linux 6.10 (el6uek.x86_64)

Database SID               testdb

Database Version         Oracle Database 12c Enterprise Edition Release 12.2.0.1.0 - 64bit Production

Oracle 13c OMS Ver   Oracle Enterprise Manager Cloud Control 13c Release 3

Following is the script for taking weekly cold backup for 13c OMS Server in a Linux environment

Step 1

Create a script with cold.sh as per my sample script

Script

echo

echo

date

echo

echo "Shutting Down OMS Services of 13c Monitoring Cloud Control for Cold Backup ......."

echo

echo

echo

export ORACLE_HOME=/u01/db/dbhome_1

export ORACLE_SID=testdb

export OMS_HOME=/u01/cloud/middleware

export AGENT_HOME=/u01/cloud/agent/agent_13.3.0.0.0

$OMS_HOME/bin/emctl stop oms -all

/u01/cloud/agent/agent_13.3.0.0.0/bin/emctl stop agent

echo "Shutting Down Database and Listener Services of 13c Monitoring Cloud Control for Cold Backup ......."

echo

echo

echo

#$ORACLE_HOME/bin/sqlplus "/ as sysdba" <<EOF1

#shutdown immediate;

#EOF1

#sqlplus "/ as sysdba" <<EOF1

#shutdown immediate;

#EOF1

#$ORACLE_HOME/bin/lsnrctl stop

date

echo

sleep 10;

date

echo "All Services are down for 13c Monitoring Cloud Control Cold Backup ......."

echo

echo

echo

date

echo "Starting Tar Backup for 13c Monitoring Cloud Control with Database"

echo

echo

echo

AS1=Oracle13c-OMS-TAR_$(date +%d-%m-%Y).tgz

#AS2=Oracle13c-DB-TAR_$(date +%d-%m-%Y).tgz

#AS3=Oracle13c-DBInventory-TAR_$(date +%d-%m-%Y).tgz

echo

/bin/tar -cvzf /u01/backup/cold/$AS1 /u01/cloud

#/bin/tar -cvzf /u01/backup/cold/$AS2 /u01/db

#/bin/tar -cvzf /u01/backup/cold/$AS3 /u01/oraInventory

echo

echo

date

echo

echo "Backup Successfully Completed for 13c Monitoring Cloud Control"

echo "Starting 13c Monitoring Cloud Control Services ......."

$ORACLE_HOME/bin/lsnrctl start

$ORACLE_HOME/bin/sqlplus "/ as sysdba" <<EOF1

startup;

EOF1

$OMS_HOME/bin/emctl start oms

/u01/cloud/agent/agent_13.3.0.0.0/bin/emctl start agent

date

echo "All Services are Up after 13c Monitoring Cloud Control Cold Backup Completion ......."

echo

echo


Step2

Create a crontab schedule job for running the above script on a weekly basis

01 00 * * 6 /home/oracle/backup/scripts/cold.sh > /home/oracle/backup/logs/cold.log

Conclusion

This script will run at 00:01 on Saturday Night, you may change it accordingly as per your desired time.


Wednesday, October 15, 2014

Export Data from Oracle using SQL*Loader


sql loader xlsx file

Using SQL Loader for Single and Multiple Files


Hello, All My Friends,
=====
This is for Windows Scenario, You can add Service using Net Configuration Assistant to connect to your server machine and that is the much safer way in my little opinion.

Let's Start it right now

For Single Load File

=======================

Requirements are as under:-
===================

  1. Create a sample table (I use Scott.dept2 table created from dept with the addition of  ENTDATE column)
  2. One control file (control.txt)
  3. One data file (data.csv)
  4. One batch file (optional)
Important Note:-

Join the newsletter

Subscribe to get our latest content by email.
Before you start working on this article, just remember that file paths must be correct and clearly mentioned with their drive letters for avoiding any inconvenience.

Here is the example

Control File (ControlFile.txt)
========

------------------------------------------------------------
-- SQL-Loader Basic Control File
------------------------------------------------------------
options  ( skip=1 )
load data
  infile 'F:\oracle\dbHome\BIN\sqlloader\single_file_Insert\dept.csv'           
  truncate into table   scott.dept2
fields terminated by ","       
optionally enclosed by '"' 
  ( DEPTNO
  , DNAME
  , LOC
  , ENTDATE
  ) 

Data File (dept.csv)
======================

  DEPTNO,DNAME,LOC,entdate
1,F1,X1,15-Oct-14
2,G1,X2,16-Oct-14
3,H1,X3,17-Oct-14
4,I1,X4,18-Oct-14
5,J1,X5,19-Oct-14
6,K1,X6,20-Oct-14
7,L1,X7,21-Oct-14
8,M1,X8,22-Oct-14
9,N1,X9,23-Oct-14
10,O1,X10,24-Oct-14
11,P1,X11,25-Oct-14
12,Q1,X12,26-Oct-14
13,R1,X13,27-Oct-14
14,S1,X14,28-Oct-14
15,T1,X15,29-Oct-14
16,U1,X16,30-Oct-14
17,V1,X17,31-Oct-14
18,W1,X18,1-Nov-14
19,X1,X19,2-Nov-14
20,Y1,X20,3-Nov-14
21,Z1,X21,4-Nov-14

Batch File (Start_SQL_Load.bat)
============

@echo off
F:\oracle\dbHome\BIN\sqlldr 'scott@pmstest' control='F:\oracle\dbHome\BIN\sqlloader\single_file_Insert\ControlFile.txt'
log='F:\oracle\dbHome\BIN\sqlloader\single_file_Insert\Results.log'
pause

Last Step
======
Just double-click this batch file. (Then just verify that records are inserted successfully)

Note: No need to create dept.bad file it will create this automatically


For Mulitple File Insertion

==============================

Requirements are as under:-
===================
  1. Create a sample table (same as above dept2 with ENTDATE column addition)
  2. Single control file (control.txt)
  3. multiple data file (data1.csv , data2.csv)
  4. One batch file (optional)

Control File (control.txt)
------------------------------------------------------------
-- SQL-Loader Basic Control File
------------------------------------------------------------
options  ( skip=1 )
load data
  infile 'F:\oracle\dbHome\BIN\sqlloader\multi_file_insert\dept1.csv'        
  infile 'F:\oracle\dbHome\BIN\sqlloader\multi_file_insert\dept2.csv'        
  truncate into table   scott.dept2
fields terminated by ","    
optionally enclosed by '"'
  ( DEPTNO
  , DNAME
  , LOC
  , entdate
  )

Ist Data File (dept1.csv)
======================

 DEPTNO,DNAME,LOC,entdate
1,F1,X1,15-Oct-14
2,G1,X2,16-Oct-14
3,H1,X3,17-Oct-14
4,I1,X4,18-Oct-14
5,J1,X5,19-Oct-14
6,K1,X6,20-Oct-14
7,L1,X7,21-Oct-14
8,M1,X8,22-Oct-14
9,N1,X9,23-Oct-14
10,O1,X10,24-Oct-14
11,P1,X11,25-Oct-14
12,Q1,X12,26-Oct-14
13,R1,X13,27-Oct-14
14,S1,X14,28-Oct-14
15,T1,X15,29-Oct-14
16,U1,X16,30-Oct-14
17,V1,X17,31-Oct-14
18,W1,X18,1-Nov-14
19,X1,X19,2-Nov-14
20,Y1,X20,3-Nov-14
21,Z1,X21,4-Nov-14


2nd Data File (dept2.csv)
======================
 DEPTNO,DNAME,LOC,entdate
22,F2,X1,17-Oct-14
23,G2,X2,18-Oct-14
24,H2,X3,19-Oct-14
25,I2,X4,20-Oct-14
26,J2,X5,21-Oct-14
27,K2,X6,22-Oct-14
28,L2,X7,23-Oct-14
29,M2,X8,24-Oct-14
30,N2,X9,25-Oct-14
31,O2,X10,26-Oct-14
32,P2,X11,27-Oct-14
33,Q2,X12,28-Oct-14
34,R2,X13,29-Oct-14
35,S2,X14,30-Oct-14
36,T2,X15,31-Oct-14
37,U2,X16,01-Nov-14
38,V2,X17,02-Nov-14
39,W2,X18,03-Nov-14
40,X2,X19,04-Nov-14
41,Y2,X20,05-Nov-14
42,Z2,X21,06-Nov-14

Batch File (Start_SQL_Load.bat)
============

@echo off
F:\oracle\dbHome\BIN\sqlldr 'scott@pmstest' control='F:\oracle\dbHome\BIN\sqlloader\multi_file_insert\ControlFile.txt'
log='F:\oracle\dbHome\BIN\sqlloader\multi_file_insert\Results.log'

pause
Last Step
=======

Just double-click this batch file. (Then just verify that records are inserted successfully using sqlplus)

Result
=======
Connected to:
Oracle Database 11g Enterprise Edition Release 11.2.0.1.0 - 64bit Production
With the Partitioning, OLAP, Data Mining, and Real Application Testing options

SQL> select * from dept2;

    DEPTNO DNAME          LOC           ENTDATE
---------- -------------- ------------- ---------
         1 F1             X1            15-OCT-14
         2 G1             X2            16-OCT-14
         3 H1             X3            17-OCT-14
         4 I1             X4            18-OCT-14
         5 J1             X5            19-OCT-14
         6 K1             X6            20-OCT-14
         7 L1             X7            21-OCT-14
         8 M1             X8            22-OCT-14
         9 N1             X9            23-OCT-14
        10 O1             X10           24-OCT-14
        11 P1             X11           25-OCT-14

    DEPTNO DNAME          LOC           ENTDATE
---------- -------------- ------------- ---------
        12 Q1             X12           26-OCT-14
        13 R1             X13           27-OCT-14
        14 S1             X14           28-OCT-14
        15 T1             X15           29-OCT-14
        16 U1             X16           30-OCT-14
        17 V1             X17           31-OCT-14
        18 W1             X18           01-NOV-14
        19 X1             X19           02-NOV-14
        20 Y1             X20           03-NOV-14
        21 Z1             X21           04-NOV-14
        22 F2             X1            17-OCT-14

    DEPTNO DNAME          LOC           ENTDATE
---------- -------------- ------------- ---------
        23 G2             X2            18-OCT-14
        24 H2             X3            19-OCT-14
        25 I2             X4            20-OCT-14
        26 J2             X5            21-OCT-14
        27 K2             X6            22-OCT-14
        28 L2             X7            23-OCT-14
        29 M2             X8            24-OCT-14
        30 N2             X9            25-OCT-14
        31 O2             X10           26-OCT-14
        32 P2             X11           27-OCT-14
        33 Q2             X12           28-OCT-14

    DEPTNO DNAME          LOC           ENTDATE
---------- -------------- ------------- ---------
        34 R2             X13           29-OCT-14
        35 S2             X14           30-OCT-14
        36 T2             X15           31-OCT-14
        37 U2             X16           01-NOV-14
        38 V2             X17           02-NOV-14
        39 W2             X18           03-NOV-14
        40 X2             X19           04-NOV-14
        41 Y2             X20           05-NOV-14
        42 Z2             X21           06-NOV-14

42 rows selected.

SQL>


Note: No need to create dept.bad file it will create this automatically 

Did you like this blog please appreciate.

Thanks & Regards,

Muhammad Kamran Saeed

Popular